Table of Contents
Survey Configuration
Defining the Survey
There are two web-based applications used to create and carry out a CVA survey:
- The CVA project manager is used to define the scope of the project, schedule interviews and analyse results.
- The CVA interview software can be used by interviewers or can be sent as a link to customers to complete the interview.
 The CVA project manager can be loaded at https://portal.pims.ai/cvaproject/ (please note the final “/”). You will be redirected to our single sign-on login page. If this is the first time you have accessed the software please register.
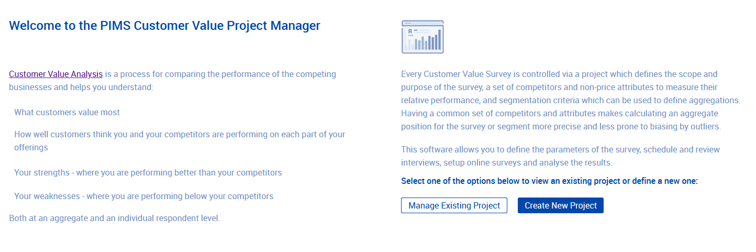
Once logged in the screen above will be displayed, click Create New Project to start the project definition.
The CVA project manager can be loaded at https://portal.pims.ai/cvaproject/ (please note the final “/”). You will be redirected to our single sign-on login page. If this is the first time you have accessed the software please register.
Once logged in the screen above will be displayed, click Create New Project to start the project definition.
Defining Additional Steps
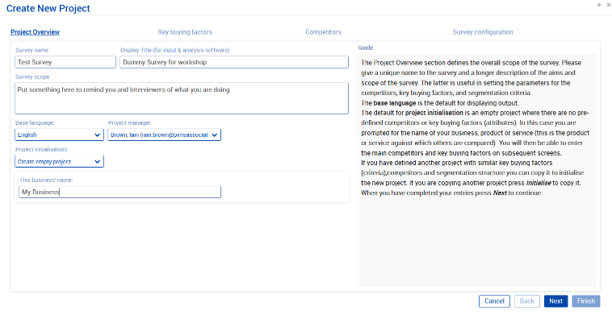
The project creation wizard has screens to define: the scope of the project; the key buying factors ( attributes); competitors; and how the interview is presented to interviewees.
You can also define segmentation options and additional questions as part of the wizard, or they can be added at a later date. Additional questions are qualitative or numerical questions that can be added to the survey and asked after the numerical input. For example, you could ask:
- Whether the interviewee expects the market to grow (and by how much)
- What areas you could improve on
- What additional services they think will become important, etc.
The Project Overview Screen
The wizard has 4 stages, with up to 2 additional steps if you selected to define segmentation and additional questions.Each stage has an on-screen guide to help with data entry. The Project overview screen, shown below, defines the name and scope of the survey, the base language (English or German) and how the project is initialized, either created from scratch or copied from an existing project.
Defining Key Buying Factors
This section is either created during an internal workshop or is based on the results of such a workshop, internal discussions, and or pilot interviews.It is important to include a definition of each attribute to make sure interviewees understand what is being asked. We recommend 10 to 12 attributes as the optimum.
 Clicking the + button from the section header displays the Add attribute dialog (shown to the left). Enter a name for the attribute and a definition and press the Add button.
The attribute will then be displayed in the appropriate section of the main screen. Once created, it can be edited in place on the main screen.
Defining Competitors
It is important to define the main competitors you think the interviewees consider. This is partially as a check on the market definition, but also it enables you to cross check your view of the market with who your customers are actively considering.

Click on the + button to add competitors to the list.
Survey Configuration
This screen is split into 3 sections and defines what is shown in the interview software, and the email configuration if you use the internal mail client to communicate with interviewees.
The first section, shown below defines the title shown in the interview software and the introductory text for both the interviewee and, if appropriate, the person carrying out the interview.
 The second section defines what competitors are “pre-defined” in the input software, and how many blank fields are there (more can be added in the interview software if required).
 Recommendation:
- For internal interviews within your company to derive the internal perspective all defined competitors are shown
- For external interviews, your business is named with up to 5 blank fields for the interviewee to include the names of competitors they actively consider.
The third section is appropriate if you are using our software to send mails and schedule interviews from within the software.
It allows you to add text to the standard mail (which can be edited before sending) and specify a return email address – if you do not specify a return email replies will probably come back to PIMS.
By default, mails are sent from the PIMS mail server. However, the last section allows you to specify your own server as the mail source.
 Note:
Whilst this facility is useful, we recommend that, if at all possible, you use your own mail account to send emails as this gives a more personalised approach. We will discuss a relatively easy way to do this in the section on scheduling interviews.
Note:
Whilst this facility is useful, we recommend that, if at all possible, you use your own mail account to send emails as this gives a more personalised approach. We will discuss a relatively easy way to do this in the section on scheduling interviews.
On completing the project defintion wizard the project will be creatd and themain CVA Project Manager menu will be displayed.
The Main Project Manager Options
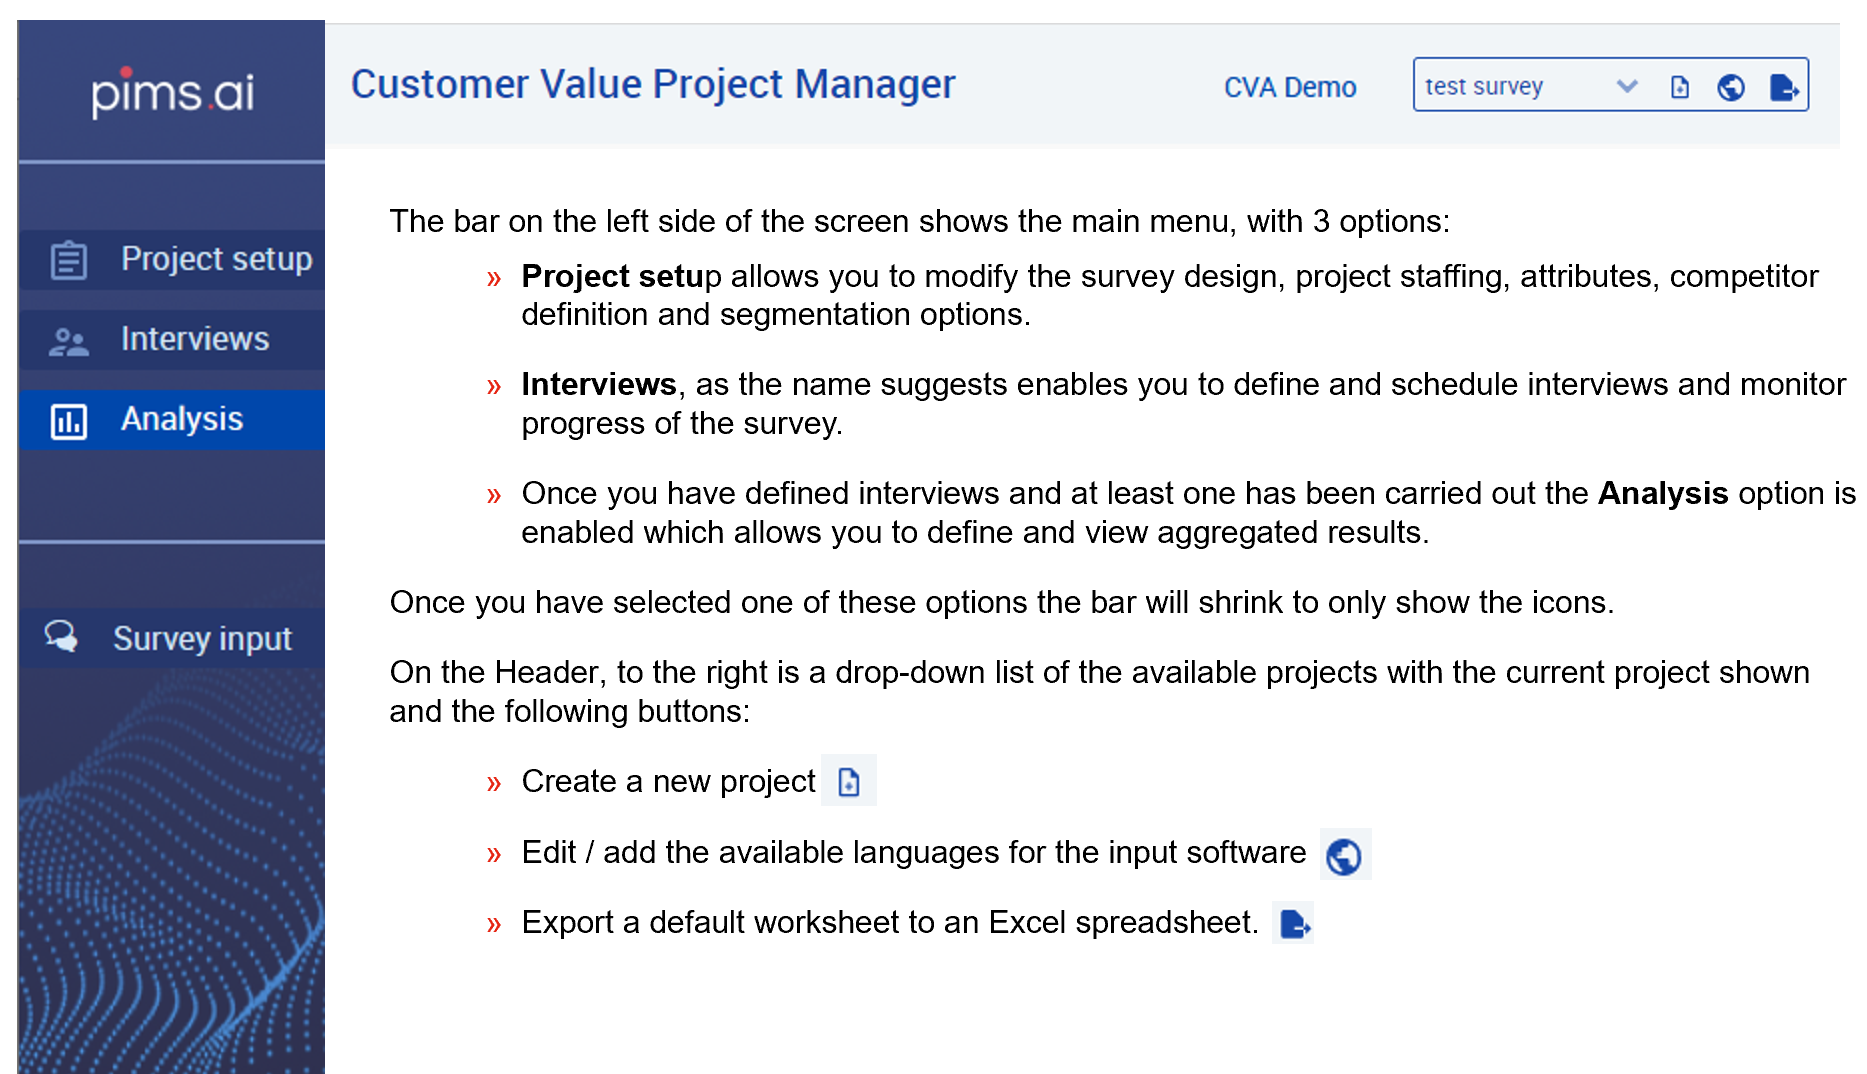
The Project Setup Menu
Overview
Selecting project setup from the menu has the same tabs as in the input wizard, with some additional options.
If you did not include segmentation or additional questions in the wizard, you can select them using the appropriate button.
In the overview tab (show below), you can edit the name and descriptions and also add staff to the project.
 Note:
Initially, only you are allowed access to the project. Other users can be added with one of the following modes:
Note:
Initially, only you are allowed access to the project. Other users can be added with one of the following modes:
- Administrators have full access including being able to modify the project staff
- Analysts can do everything an administrator can except for modifying the project details
- Interviewers can conduct interviews, but do not have access to the project manager software
- Read only users can view the output of the analysis in the project manager but cannot see individual interviews or make any changes.
Attributes
The attributes screen allows you to modify and add attributes as in the wizard, but also has an extra column, “Assignment”.
This gives you the option of merging attributes for analysis if you have specified some similar attributes or to ignore an attribute.
The latter is useful as a sensitivity analysis, if not all respondents have scored a particular attribute or if you have included an attribute (such as safety) which is a prerequisite for competition and therefore could be skewing results.
 Note:
Changing attributes whilst interviews are taking place could cause compatibility issues and is not recommended.
Note:
Changing attributes whilst interviews are taking place could cause compatibility issues and is not recommended.
Competitors
The Competitors tab shows the pre-defined competitors plus additional ones which have been entered by the interviewee.
 Note:
Often interviewees will use a different name for competitors, in this case you can use the assign/ignore option to merge competitors in the analysis.
You can also choose to ignore a competitor in the analysis if they are an extreme example or have only been scored by 1 competitor and may be skewing results.
Note:
Often interviewees will use a different name for competitors, in this case you can use the assign/ignore option to merge competitors in the analysis.
You can also choose to ignore a competitor in the analysis if they are an extreme example or have only been scored by 1 competitor and may be skewing results.
Segmentation
The Segmentation tab allows you to define different categories for segmentation. There are 3 pre-defined categories as shown below, but more can be added.
 Note:
Press the + to add codes to a category and the – to delete them. The pencil icon can be used to change the name of the category.
Note:
Press the + to add codes to a category and the – to delete them. The pencil icon can be used to change the name of the category.
Additional Questions
The Additional questions tab allows you to define questions around the CVA worksheet. They can be positioned before the survey, between the sections, or after the CVA input. We recommend they always come after the CVA input as they are less important than the CVA input.
Questions can either ask for a text answer, a yes/no answer, or a numerical value.

Adding Input Languages
If you are carrying out multi-lingual surveys the interview software is available in several languages and additional ones can be added by contacting PIMS.
Once you have defined attributes, segmentation criteria and any additional questions they can be translated by clicking the globe icon next to the project name in header to show the Project languages dialog.
This contains a dropdown list of existing language definitions. To define a new language, click on the + button to show the Add language dialog.

Note:
The Add language dialog show a list of the available languages in our machine translation software, select one and press the add button to generate an initial set of translations.
The English text and initial translations will then be shown on the screen.
Tabs will then be shown for each of the areas requiring translation. Attributes, segmentation text and additional questions are automatically translated, the survey configuration (show below) however requires each field to be translated.
 Note:
Click on the translate button for the automatic translation and make any changes you feel necessary before saving that page.
The Attributes tab translates each line and its definition separately and unlike the first page if you make any changes to a line you save that line rather than the whole sheet.
Once you have defined additional languages, if you add or make changes to attributes, segmentation, or additional questions you will be asked to translate into all the defined languages.
Note:
Click on the translate button for the automatic translation and make any changes you feel necessary before saving that page.
The Attributes tab translates each line and its definition separately and unlike the first page if you make any changes to a line you save that line rather than the whole sheet.
Once you have defined additional languages, if you add or make changes to attributes, segmentation, or additional questions you will be asked to translate into all the defined languages.

Next: Scheduling Interviews